


Looking for Tricks When Applying Highlighter and Blush? A Detailed Guide
Do you find it hard when applying highlighter and blush? For the makeup step of highlighting, many people think it is dispensable. In fact, once there are prominent parts on the face, it will make our entire facial contour look more three-dimensional and fuller, especially for the T-zone, zygomatic smile muscles, and so on.
Every time people put on makeup, the liquid foundation of the base makeup will cover the natural shadow of the face, so it will appear that the face is not so three-dimensional. Therefore, the combination of highlights and shadows is very important. After highlighting, it can not only make the face look more three-dimensional but also can well modify the defects of the face.
Some people who are new to makeup may think that it is too difficult to draw highlights, but in fact, the so-called highlights refer to applying a layer of dark foundation on some areas of the facial contours to make the facial features look more three-dimensional and exquisite. This approach is like a "facelift" magic, not only can brighten our complexion, but also make the whole makeup look clear and translucent like ceramics.
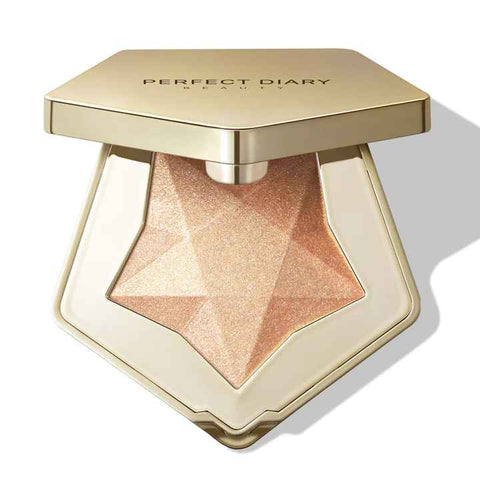
But for different face shapes and facial features, the position of highlighting is not the same. Generally speaking, it is not difficult to find the highlighted area, and most of them will be drawn in the middle, including the cheek and T-shaped area. Here we take Perfect Diary's Star Dust Diamond Highlight Powder as an example to give you some tips.
Some girls do not know what to do when applying highlighter and blush. For example, because the T-zone is the hardest-hit area on our face, once we wear makeup for a long time, it will be greasy and dirty, so girls need to pay more attention when applying makeup.
Firstly, slowly smudge the creamy highlighter from the forehead to the bridge of the nose. The length and width should be based on the distance between your eyebrows, as long as it is slightly longer than the two eyebrows.
Or highlighting the cheekbones will make the face more full and can also modify the wrinkles in the corners of the eyes. First use a highlighter to draw a heart-shaped area on the cheekbones, determine the position of the highlights, and then use your fingertips to push the highlights away to enhance the contours of the face.
Of course, this high-gloss powder is suitable for both the face and the body, because the price is not expensive. Its powder is very fine, it will not fly powder, and it fits the skin very well. What you will like the most is its makeup feel. Sweeping it on the skin with a makeup brush is like covering the skin with a bright galaxy, which is very eye-catching under the sunlight.
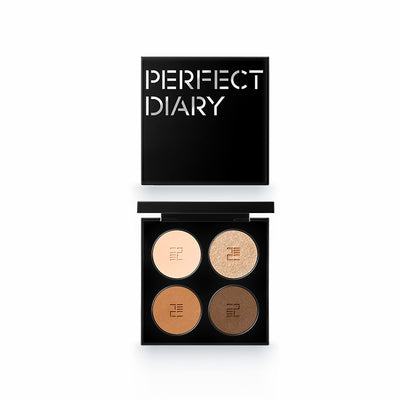
If you want to save money on purchases, consider the 3-in-1 Sculpting Palette when applying highlighter and blush. This item contains three different shades of highlighter, blush, and shadow. After 18 hours of high-temperature baking, the powder and oil are evenly fused together.
Not only is the powder fine and close to the skin, but it is also very light after being applied to the face, easy to develop color, and does not fly powder. Combined with the 3D pearlescent technology imported from Germany, the skin will reveal a natural and delicate light feeling after use.
For those who are new to makeup, the three-in-one design can modify the soft face shape, make the face shape more three-dimensional, and the facial features look more delicate. For example, when applying blush, lightly flick off the remaining powder with your fingers, then blend the blush in a circle along the cheekbones, then take an appropriate amount of pink blush, and tap it on the smiling skin The highest position can well highlight the sweetness.
Also, if you like Japanese makeup, you can apply the blush directly on the triangular area under the eyes, or you can apply the blush to the eye area along a small part of the eye shadow. But be sure to use a small amount and multiple times to create a gradient effect from deep to light from the inside to the outside!